
Partial dentures are classed as a removable prosthesis used for the replacement of one or more teeth. Its is most commonly made of plastic acrylic or metal with false teeth joined to it in order to replace the missing tooth/teeth.
| ADVANTAGES OF A DENTURE | DISADVANTAGES OF A DENTURE |
|---|---|
| Improve aesthetics | Can act as a plaque trap |
| Provides stability to teeth in same arch by preventing tilting or drifting | Increases load to mucosa and teeth |
| Provides stability to teeth in opposite arch by preventing over-eruption | |
| Improves function |
Theory
- Psychological factors
- Aesthetics
- Comfort
- Function
- Speech
- Leave and monitor
- Shortened dental arch
- Bridges (see bridges)
- Partial CoCr denture
- Partial acrylic denture
- Implants
Retention
Features of a dental prosthesis that resist displacement along the path of insertion
Guide-planes and clasps are used to limit the path of placement and thus improve retention.

@brisbanechromecasting

Limiting that path of placement = Better retention
Support
Support refers to the foundations on which a dental prosthesis lies e.g. alveolar ridge.
Cobalt chrome dentures utilise rest seats as support. They stop the denture from going further down into the mucosa

@brisbanechromecasting
Dentures can be supported in a number of ways and these have been classified as shown below.
Classification of support (Osborne and lammie):
Class I – denture supported by mucosa and underlying bone
Class II – denture supported by teeth
Class III – denture supported by a combination of mucosa and tooth borne means
Class IV – denture supported by implants
Saddle/denture base
Part of the denture that rests on the foundation tissues and to which teeth are attached.

@brisbanechromecasting
This is method of classifying the edentulous arch in order to assist in the subsequent denture design. It was introduced in 1925 by Dr Edward Kennedy.
Classification:
Class I – Bilateral free end saddles

Class I
Class II – Unilateral free end saddles

Class II
Class III – Bounded saddle

Class III
Class IV – Bounded saddle that crosses the midline

Class IV
Modifications also exist for classes I-II in order to further specify their classification providing a more accurate description.
Method of determining the kennedy classification and the modification:
- Always identify the lowest classification in the cast. This is the Kennedy classification.
- Then count the number of remaining saddles. This is the modification
Example:
In the image below if we look at the 2 saddles in isolation, there is a class III present and a class IV present. The lower classification always becomes the Kennedy classification. This means this is a class III. That leaves one remaining saddle making it a modification 1.
Therefore, this would be classified as Class III modification 1.

Class III mod I
These are used to map out undercut areas in the soft tissue and tooth tissue. They are a fundamental part of the denture design process (see further down).

Via @dralien @moza_arts
Why we survey?
- Shows us the area of greatest convexity for clasps placement
- Allows us to choose a path of insertion
- Allows us to plan for guide planes
Surveying tools:
- Analysing rod – used to determine the path of insertion and removal
- Graphite marker – used to mark the area of greatest convexity of tooth/tissue
- Undercut gauges (0.25, 0.5, 0.75 mm) – used to measure the horizontal depth of the undercut to determine the precise location of the terminal end of the clasp
- Surveying chisel – used to remove excess material during the blocking out procedure

1.Analysing rod

2.Graphite mark

3.Undercut gauge

4.Surveying chisel
Order of surveying
- Visual assessment – With analysing rod
- Initial survey – With the occlusal plane horizontal (see further down)
- Tilted survey (see further down)
- Final survey (see further down)
Initial survey
The initial survey is done to gauge the presence of natural undercuts, potential stagnation areas and unaesthetic black triangles. This will allow you to determine whether a tilted survey is necessary.
The other important thing to note is that the initial survey line is relevant to the path of displacement which is always perpendicular to the occlusal plane, regardless of the tilt and planned path of insertion. Therefore, any retentive components in your design must be under both the initial survey line and the tilted one.
The side of the graphite marker is placed on each tooth and moved round each of the vertical surfaces
Tilted survey
If we do not use the abutment undercuts (mesially and distally) and had a vertical path of insertion, then the path of insertion would be the same as path of displacement. Moreover the undercuts can be an area for food packing.

Path of insertion = Path of displacement
Anterior tilt:

- This will improve aesthetics, as the anterior black triangle is removed and improve retention, which will be gained from the premolars distal undercut.
- The black lines indicate the area of undercut at zero tilt, and the red lines at anterior tilt.
- When placing clasps, make sure they are placed below BOTH survey lines.

Posterior tilt:

This will improve retention, by utilising the molars mesial undercut, but will make the premolar undercut bigger and more unsightly.

When used in an anterior bounded saddle however, it eliminates any black interproximal spaces as well as improving retention.

Zero tilt
As shown, at zero tilt, there are unsightly black inter-proximal triangles found in anterior bounded saddles which can also act a plaque trap.
Moreover, because the undercut is not being utilised, there is poor replacement of soft tissue, resulting in a puffy upper lip appearance as the denture would bulge out.

Posterior tilt
Once a posterior tilt is done, the undercuts that form the black unsightly inter-proximal triangles are eliminated, improving aesthetics as well as retention.
Types of Partial Dentures
Most commonly used denture, made of an acrylic baseplate used to replicate the mucosa.

Via dover dental labs inc.
This is an essentially an acrylic denture with a metal framework.


Via @hareketliprotez
A denture that overlies tooth roots, implants, retained teeth or even severely worn down teeth. Tooth roots provide increased proprioception for the denture. The roots are often, though not always, endodontically treated.
A denture used to replace teeth immediately post extraction. Most commonly used post anterior teeth extraction where aesthetics are paramount.
A mucosa born denture that conforms to a specific design that ensures gingival health. It has features that distinguish it from the other types of dentures.
Features:
- Single point contact – This refers to the contact between the artificial teeth and the adjacent abutment teeth at a single point (on or above the survey line).
- Wide embrasures - To allow natural stimulation and cleaning of gingivae and to reduce stagnation areas.
- Free occlusion - The acrylic teeth are put out of occlusion. This is established via the use of adjustable articulator and reduction of cuspal interference by selective grinding.
- Uncovered gingivae - At no point on the palatal, buccal or inter-proximal aspects should acrylic cover the gingival tissues
- Contact of distal surface of last standing tooth – Contact by either the denture base or stainless steel distal stabilisers is necessary in order to maintain the contact points and also to prevent distal migration of the last standing tooth.
Every denture
Indications:
- Suited for a flat profile palate as it is mucosa-borne
- Where there are more than two saddles.
- Where there is an absence of free-end saddles
- Where the long-term prognosis of the remaining standing teeth is doubtful.
A spoon denture is usually a single toothed denture attached to a spoon-shaped acrylic that fits into the palate.
Partial denture design
- SADDLE
- SUPPORT
- RETENTION
- INDIRECT RETENTION
- MINOR CONNECTORS
- MAJOR CONNECTORS
The first stage in designing a partial denture is to asses the saddles and to classify them in line with the Kennedy classification (see above).
This will assist you with the designing of the denture.
Support is achieved from the rest seats and the mucosa.
Therefore, you need to decide exactly where the support is going to come from. This is done by positioning the rest seats where suitable. The positioning of the rest seats is highly dependent on the saddle you are dealing with.
Here is a basic format to follow for where to place the rest seats depending on the saddle:
Free end saddles (Class I/II) – use the RPI/RPA sytem (see further down)
Bounded saddles (class III) – place rest seats on either side of the saddle (mesially on the distal tooth and distally on the mesial tooth)

Rest seat placement for Class III
Bounded saddles crossing the midline (class IV) – place two rest seats on each terminal abutment mesially and distally where applicable. If one of the terminal abutments is a canine for example only one rest seat should be placed.

Rest seat placement for Class IV
Free end saddle
Free end saddles are tooth and mucosa supported, so you have a unique problem with them called support differential that you don’t have with completely tooth-supported saddles. When you chew or apply any kind of pressure on the free end saddle, the FES part of the denture will sink into the mucosa because mucosa is compressible. This causes torquing of the tooth causing it to become mobile or tip backwards.
This can be treated in 3 ways:
- RPI system
- Stress breaker
- Rigid connector (altered cast technique)
1. RPI system:
Rest (mesial)
Proximal plate (distal)
I bar (gingivally approaching)

How the RPI system works:

- When the saddle is loaded, rotation of the denture occurs around the mesial rest.
- The proximal plate moves down the tooth, in theory, by 2mm.
- The I bar disengages the tooth and slides mesially and down the tooth.
- Also, because of the mesially positioned rest as opposed to distal rest, the distance from the rest to the saddle increases, thus the arch of the denture movement decreases. Hence the force on the ridge is more vertical, resulting in less forces on the abutment tooth.
- In addition, it directs tipping forces on the abutment mesially as opposed to distally. This moves the tooth into firm contact with the adjacent teeth, as opposed to tipping it distally.

RPI system
2. Rigid connector (altered cast technique)
This technique tries to overcome the problem of differential support, by taking an impression of the ridge under controlled pressure, which produces a compressive impression that mimics functional loading.
Steps:
- The technician will make a rigid acrylic resin tray on top of the existing metal framework
- The clinician then loads the acrylic resin tray with Zinc oxide eugenol
- The framework is then used to take an impression, pressure is applied only on the occlusal rests
- The technician will then remove the free end saddle section of the original cast
- The framework is seated back on the cast that has been sectioned, the posterior part of the cast is then cast up and set to form a single cast
- The result is a compressive impression that mimics functional loading

1.Initial impression

2. Acrylic resin tray made

3.Impression taken using ZnOE

4.Impression to be casted up
Via @r.shiba.h.kdental
3. Stress breaker
This is where the mucosa supported area of the denture moves independently of the tooth supported area, via a flexible major connector. This provides a stress release when occlusal force is applied to the denture, reducing the torqueing force on the distal tooth preventing it from tipping distally.

They are however not always effective, as they have 2 major problems with them:
Clasps provide the primary means of retention in a partial denture.
Some important features about clasps:
- The longer the clasp the more flexible it is
- The last third of the clasp engages in the undercut area
- The clasps position is determined by the undercut guage
- They can be made from wrought or cast metal, wrought metal is more flexible than cast metal so more useful when the undercut is larger.
Claps materials and the undercut depth required:
- Wrought stainless steel – 0.75 mm
- Wrought gold wire – 0.5 mm
- Cast Cobalt Chromium – 0.25 mm
Clasps can be broken down into 2 categories:
- Occlusally approaching clasps – Approach the undercut from the occlusal area and are used with molars
- Gingivally approaching clasps – Approach the undercut by crossing the gingival margin, used with premolars and anterior teeth

Occlusal approaching clasps are used for the molars and a gingival approaching clasp for the canine
Reciprocation
Reciprocation is any component of a partial denture which prevents displacement of a tooth by the active retentive forces (clasps).
If a clasp is used without reciprocation then it can act almost as an orthodontic appliance causing the tooth to tip.
The reciprocation component is the rigid component in contact with the tooth on the opposite side of the clasp. It maintains contact with the tooth and resists lateral forces applied to the tooth generated by the clasp arm as it moves out of the undercut, preventing the clasp causing tooth movement.
The reciprocating unit provides an equal and opposite force on the tooth when the retentive clasp is active.
Also, the reciprocating unit forces the claps to flex when it moves over the area of maximum bulbosity, increasing the retentive efficiency.
Reciprocation can be provided by a reciprocating clasp arm or the baseplate.

@brisbanechromecasting
As shown, in the image above the arrows are pointing to the reciprocation units of the partial denture. For the molars a reciprocating clasp is used to provide the reciprocation against the buccally positioned occlusally approaching clasps.
For the anterior teeth the baseplate is used as the reciprocating unit as it is extended onto the palatal surface of the tooth
Indirect retention is part of the partial denture which prevents the tips of the retentive clasp from becoming a fulcrum about which the prosthesis can rotate when rotational forces are applied to the denture.
It can be achieved from both rest seats or the baseplate.
How it works?
- Retention is provided, but indirectly, by the rests
- Think of sticky toffee – when a person chews on toffee the posterior denture base rotates off
- Rotation will start about the fulcrum axis which is determined by the positions of the clasps
- Saddle rotation will be away from the tissues
- Rests can be used to prevent this from happening
- Indirect retention is mainly a problem in free end saddles and should always be accounted for when designing the denture, in tooth bounded saddles they are less problematic but should still be considered when the saddle is large.
Method of achieving indirect retention:
1. First determine where the support and initial retention are going to come from as explained above. Once this has been done, in order to decide the position of the rest seats for indirect retention, an imaginary line should be drawn through the most posterior left and right rest seats as shown below.
Class I Kennedy Classification
2. Next, draw imaginary perpendicular lines (blue) that go through the teeth furthest away.
3. The tooth that is furthest away should then be the tooth which is going to be used for indirect retention and where the rest seat should be placed. In this case you have a choice between either of the 2 central incisors.
Rest seat shown in red
Below are more examples:

Class II Modification I
In the case above, the teeth furthest away are the lateral incisor and the canine. However, lateral incisors are not good for rest seats as they are small. Canine is the next best option.

Class I
Again, the lateral incisor is avoided and the central incisor is used for the rest seat.

Class IV
Here, both molars are used for indirect retention. Rest seat should be placed mesially and distally as shown.
Class IV
Indirect retention here is obtained from the last molar by placing mesial and distal rest seats.


@brisbanechromecasting
As shown, the red circles indicate where the indirect retention is coming from.
In most cases, the indirect retention is coming from the lingual plate which can be extended onto the tooth tissue and serves the same role as placing a rest seat.
It is often a better choice as the baseplate is going to extend to that region anyway. Moreover, rest seats are not well suited for small lower incisors.
In the case of the yellow cast, rest seats on the canines have been utilised. Again, the lower incisors have been avoided.
Minor connectors join the major connector to the base and to other components, such as rest seats and clasps.
Major connector joins the saddle areas to form the baseplate.
Major connectors should be:
- Rigid
- Have smooth rounded internal angles
- Conform to anatomical structures
- Not encourage food entrapment
- Not covere excess tissue
- Not use marginal gingiva for support
- Not impinge on soft/hard tissue
- Not interfere with movable tissues
There are different type of major connectors, which can be carefully selected for different clinical situations.
Below are a list of common major connectors:
Maxillary connectors
Antero-posterior palatal strap (Ring)

- Clears the palate
- Less metal also makes it lighter
- Patient can appreciate the warmth of food

- Useful for bilateral bounded saddles
- Uncovers most of the palate
- Patient can appreciate warmth of food
- Light
Palatal plate
- Commonly used for class I
- Useful for very large saddles
- However they are heavy making retention difficult, they also cover large amounts of palatal tissue, which often isn’t well tolerated
Horseshoe design
- Used when patient has a gag reflex or can’t tolerate excessive contact of the palate
- Useful for patients with a Palatal tori
Mandibular connectors
Lingual bar

Requires a minimum of 7 mm of space; 4 mm for the bar and 3 mm for gingival clearance
Kennedy bar

- This is used when there is not enough space for a lingual bar (7 mm), a bar less than 4 mm will make it too brittle
- A Kennedy bar consists of 2 bars less than 4 mm
- One bar is on the teeth and one bar on the mucosa
Sub-lingual bar

- It can be used when a lingual bar cannot be used due to lack of space
- They are however more chunky and often not used
Dental bar

- This is a thick bar running behind the teeth keeping the gingiva clear
- Used when there is insufficient space for a lingual bar and for indirect retention
- Can also be used when there is a lingual tori or a deep undercut on the lingual alveolus making a good fit difficult to achieve
Lingual plate

- This essentially covers everything in metal
- Used when there is insufficient space for a lingual bar and also when indirect retention is required in large free end saddles
Labial bar

Often used if a bar cannot be placed lingually for example due to a mandibular tori, lingually inclined teeth etc.

Lingual tori @prostesis_dentales_vzla
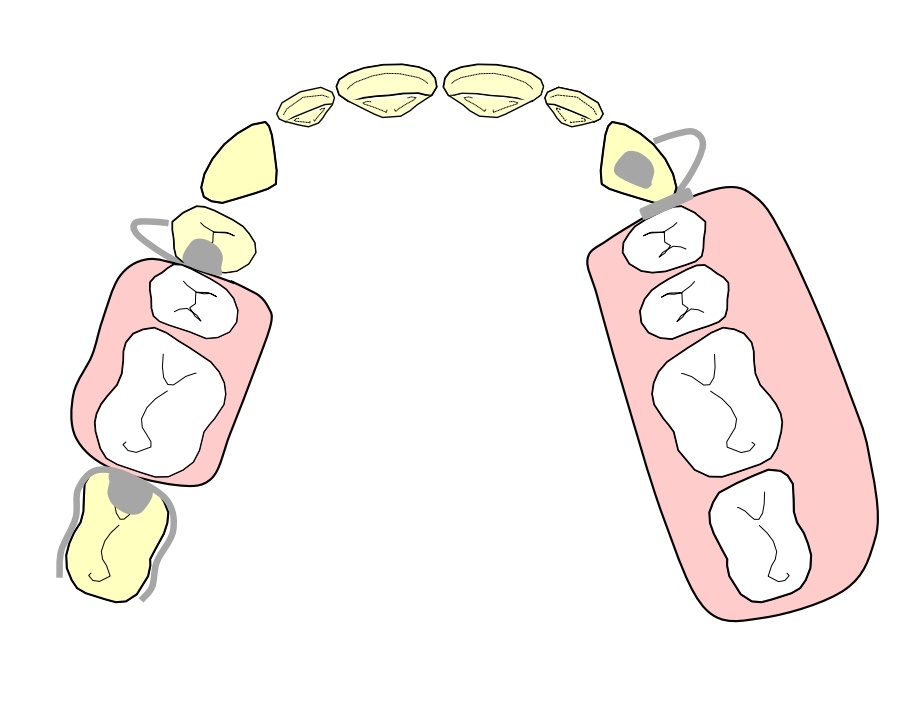
Below is an example of a dentate saddle which you may find in a clinical situation. We will go through step by step how to design a partial denture for such a patient.
Note: For the following example assume all present teeth are sound

Identify the saddles
First identify the saddle areas as shown. This is a Kennedy Class 2 Modification 1.
Class 2 Modification II
Identify the support
You then need to decide on which teeth you want to place support. For bounded saddles we place rest seats on both terminal abutment teeth. For free end saddles we use the RPI system, see above. We have placed an I bar clasp and a proximal plate for practicality, although these would normally be placed in the retention stage.

Mesial rest on the UR7 and distal rest on the UR4. Rest seat on the canine as part of the RPI system.
Identify retention and reciprocation
First a surveyor must be used to identify areas of undercut, only then can you decide where to place clasps for retention. Remember once you decide where you are going to place clasps, you need to decide where you will achieve reciprocation from. In the case of the UL3 and UR4 reciprocation will be achieved from the baseplate and for the UR7 from the reciprocation clasp as shown.
Gingival approaching clasps on the UL3 and UR4. Occlusally approaching clasp on the UR7.
Identify indirect retention
Indirect retention in this case can be achieved from the canine, lateral incisor or central incisor. Avoid using rests on lateral incisors. We decided to go for the canine, although the central incisor can also be used.
Indirect rest seat shown in red
Minor and major connectors
For the final stage you need to connect all the component together. The major connect we have decided to go for in this case is an anterior posterior connector
Anterior posterior (ring) connector
You need a preliminary jaw reg where:
a) ICP is unstable i.e. you don’t have 3 point occlusal contacts/stops to reliably locate the casts against each other.
b) You have a stable ICP but the OVD is inadequate and you want to increase it.
c) There are no occlusal stops/contacts at all between the remaining natural dentition so you have no way of accurately locating the casts to each other.
In such a situation the role of the two jaw registrations is the following:
Preliminary jaw registration – to locate the casts to each other and mount them on an articulator.
Second jaw registration – to prescribe the positioning of the teeth.
Clinical stages
See also Complete Dentures
